Fitting an Easy Walk Harness…It’s Easier than You Think!
October 28, 2012
There are a lot of fantastic tools out there that will prevent your dog from pulling. If they don’t completely stop it, they’ll at least take some of the edge off so that you’re not dealing with a nasty case of carpal tunnel for the next decade thanks to your dog’s love of random street garbage. In week one of our basic classes we take a good chunk of time to just go over all the different products out there, considering what works and what’s going to make the problem worse. Just for the sake of covering my arse, let me just say right now that we do NOT endorse choke chains, prong collars, or any other medieval torture devices on the market. I’m going to take the high road on that one and completely side step the debate-but suffice it to say that if it didn’t hurt, it wouldn’t stop the pulling…I don’t care how “tough” your individual dog is. Punishment has to be PUNISHING to stop the behaviour. Moving on.
Our students are so eager and so lovely that they all go out and buy an Easy Walk harness (my favourite brand that’s the easiest to find) immediately after our first class. However, I usually get a small crew of people in week two that are completely confused as to whether they have it on right. Is it upside down? How tight should it be? What do I do if he grows out of it? I’ve decided to explain in detail the fitting instructions to cut out a lot of the guess work.
The Easy Walk
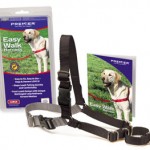 I should say that I tend to recommend this harness over other harnesses on the market mostly because it’s easier to find. For our clients, convenience is the most important thing. There are other fantastic harnesses out there such as the Sense-ible harness and the Sense-ation harness that will accomplish the same goals. Even better, but even HARDER to find is the Freedom Harness. It’s a trainer favourite because it has TWO points of attachment (on the chest and the back) to give you better control. It also comes with a handy dandy leash that has ONE handhold, but two separate leashes to attach at each buckle at the same time. Wow…things have come a long way since I was dragged around my neighbourhood while my dog choked herself on a choke chain for hours on end!
The easy walk seems pretty straightforward to fit, but it can be quite confusing if you’ve never done it before, so let me break it down for you (one of my few chances to put an MC Hammer reference in a dog training blog).
 Whenever you introduce something new to your dog and you’re not sure if he’ll like it, pair it with treats. If you’re consistent, he’ll start to look forward to seeing the harness come out.
Step 2: Get it Right-Side Up!
Make sure the harness isn’t on upside down. The part of the harness that is a different colour than the other two parts, goes underneath the body, just behind the front legs. The “D” ring, where the leash attaches, always goes at the front of the chest. When putting it on and removing it, I only ever unbuckle the coloured part. That way you can just slide the harness over his head (with the “D” ring under his chin) in order to attach the buckle under his body. Easy Peesy.
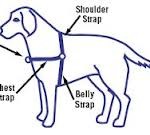
Step 3: Fit the Top and Bottom FIRST.
Before you even think about fitting the strap across his chest, worry about the straps around his body. The “O” ring on either side should be behind and above his legs. This will ensure that the strap forms a straight line all the way around his rib cage. You’ll have to eye-ball it a little bit at first and play around a lot, but eventually it should be sitting snug around his body, with both rings sitting just above and behind the meaty part of his leg. If you can fit two fingers under the harness between his shoulder blades then it’s just right. Your dog will feel like a true Goldilocks:)
Step 4: Fit the Chest Strap
Once you’ve gotten past the body strap it’s time to fit the part that goes across the front of his chest. This part’s important. If you fit it too tight, it could squeeze his front legs together and limit mobility as well as just being downright uncomfortable. If you fit it too loose, then it’ll slide sideways while he walks and he’ll be able to pull much harder. Basically, the chest strap should sit perpendicular to the body strap. It should literally look like a “T” on it’s side. It shouldn’t hang down, and it shouldn’t ride up. Because you’re adjusting these straps last, it should be really straightforward to get the right fit.
Hopefully what you’re left with is a snug, perfectly-fitting no-pull front harness. Just because I love you, I’ve found a wonderful video that explains in details with VISUALS, what I’ve just outlined. Click HERE to watch the clip. Happy fitting everyone!